Last week, I published an article about how to deploy to Firebase App Distribution, an Android app built with Flutter.
Today let's learn how to do the same thing with iOS.
Creating the keys
To sign your app, you will need an Apple Developer account. Once you created.
Signing Certificate
The signing certificate is something specific to your Apple Account, and you're going to need it in the p12 format. To see how you can export your certificate, you can follow those Apple's instructions.
When you're exporting the p12, you will also create a password for it.
Provisioning Profile
You also need to download your provisioning profile in the .mobileprovision format. You can see documentation on how to do it here.
Setting the secrets
Once you've created everything, you can copy your key in GitHub Action secrets (see part one to see the process). The secrets are defined like this in the following scripts:
STAGING_BUILD_CERTIFICATE_BASE64with
base64 build_certificate.p12 | pbcopySTAGING_P12_PASSWORDis the password of your Signing CertificateSTAGING_BUILD_PROVISION_PROFILE_BASE64with
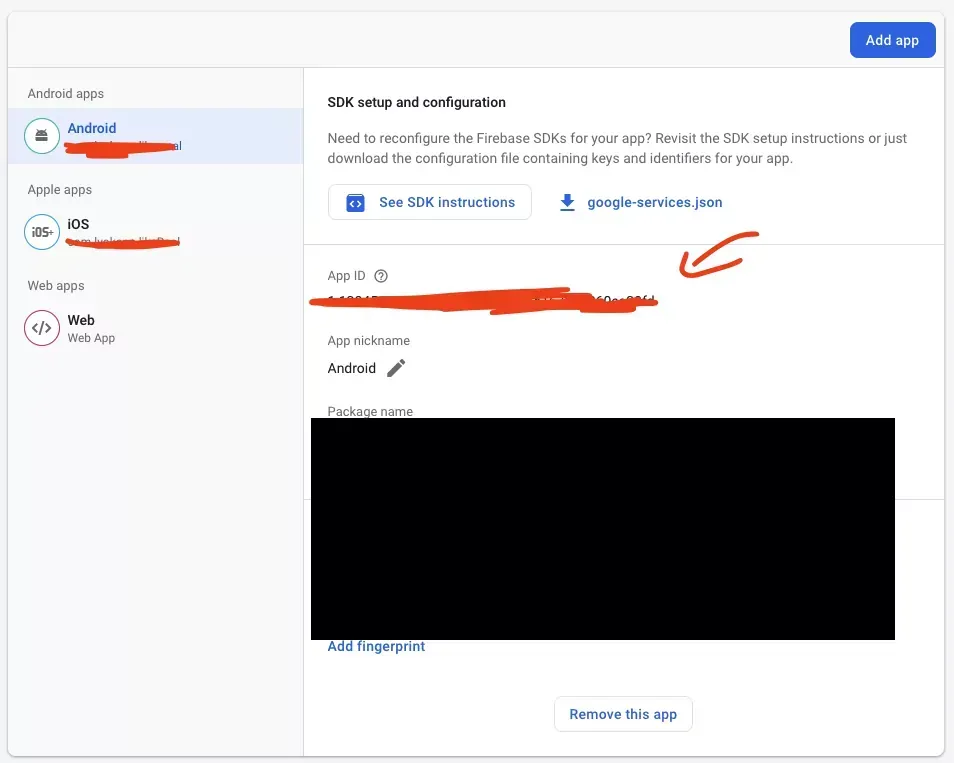
base64 provisioning_profile.mobileprovision | pbcopySTAGING_KEYCHAIN_PASSWORDis a password that will be used for your Keychain and defined on the first runIOS_FIREBASE_APP_ID_STAGINGis the id of your iOS app that you can find on the Firebase Console
FIREBASE_TOKENis a CI token that you can create using this command
firebase login:ciThe export file
In your ios folder, create an ExportOptions.plist with this inside:
<?xml version="1.0" encoding="UTF-8"?>
<!DOCTYPE plist PUBLIC "-//Apple//DTD PLIST 1.0//EN" "http://www.apple.com/DTDs/PropertyList-1.0.dtd">
<plist version="1.0">
    <dict>
        <key>method</key>
        <string>enterprise</string>        <!-- app-store, ad-hoc, enterprise, development -->
        <key>teamID</key>
        <string>YOUR_TEAM_ID</string>
        <key>signingStyle</key>
        <string>manual</string>
        <key>provisioningProfiles</key>
        <dict>
            <key>com.your_ent.your_app</key>
            <string>YOUR_APP_NAME</string>
        </dict>
    </dict>
</plist>
You need to change the method, team id, and match the provisioning profile information with the one in the profile from the precedent step. You can see the details of your profile by opening it on macOS!
The CI
Once you've created all these secrets (?), you can finally create the workflow file!
name: Deploy iOS to Firebase App Distribution on merge
on:
  push:
    branches:
      - master
jobs:
  build-ios:
    runs-on: macos-latest
    defaults:
      run:
        working-directory: app

    steps:
      - uses: actions/checkout@v2

      - uses: subosito/flutter-action@v1.5.3

      - name: Install Dependencies
        run: flutter packages get

      - name: Install the Apple certificate and provisioning profile
        env:
          BUILD_CERTIFICATE_BASE64: ${{ secrets.STAGING_BUILD_CERTIFICATE_BASE64 }}
          P12_PASSWORD: ${{ secrets.STAGING_P12_PASSWORD }}
          BUILD_PROVISION_PROFILE_BASE64: ${{ secrets.STAGING_BUILD_PROVISION_PROFILE_BASE64 }}
          KEYCHAIN_PASSWORD: ${{ secrets.STAGING_KEYCHAIN_PASSWORD }}
        run: |
          # create variables
          CERTIFICATE_PATH=$RUNNER_TEMP/build_certificate.p12
          PP_PATH=$RUNNER_TEMP/build_pp.mobileprovision
          KEYCHAIN_PATH=$RUNNER_TEMP/app-signing.keychain-db

          # import certificate and provisioning profile from secrets
          echo -n "$BUILD_CERTIFICATE_BASE64" | base64 --decode --output $CERTIFICATE_PATH
          echo -n "$BUILD_PROVISION_PROFILE_BASE64" | base64 --decode --output $PP_PATH

          # create temporary keychain
          security create-keychain -p "$KEYCHAIN_PASSWORD" $KEYCHAIN_PATH
          security set-keychain-settings -lut 21600 $KEYCHAIN_PATH
          security unlock-keychain -p "$KEYCHAIN_PASSWORD" $KEYCHAIN_PATH

          # import certificate to keychain
          security import $CERTIFICATE_PATH -P "$P12_PASSWORD" -A -t cert -f pkcs12 -k $KEYCHAIN_PATH
          security list-keychain -d user -s $KEYCHAIN_PATH

          # apply provisioning profile
          mkdir -p ~/Library/MobileDevice/Provisioning\ Profiles
          cp $PP_PATH ~/Library/MobileDevice/Provisioning\ Profiles

      - name: Build
        run: flutter build ios --release --no-codesign

      - name: Build resolve Swift dependencies
        run: xcodebuild -resolvePackageDependencies -workspace ios/Runner.xcworkspace -scheme Runner -configuration "Release"

      - name: Build xArchive
        run: |
          xcodebuild -workspace ios/Runner.xcworkspace -scheme Runner -configuration "Release-staging" DEVELOPMENT_TEAM=**DEV_TEAM** -sdk 'iphoneos' -destination 'generic/platform=iOS' -archivePath build-output/app.xcarchive PROVISIONING_PROFILE=**PROVISIONING_PROFILE_ID** clean archive CODE_SIGN_IDENTITY="**CODE_SIGNING_IDENTITY**"

      - name: Export ipa
        run: |
          xcodebuild -exportArchive -archivePath build-output/app.xcarchive -exportPath build-output/ios -exportOptionsPlist ios/ExportOptions.plist

      - name: Upload artifact
        uses: actions/upload-artifact@v2
        with:
          name: App.ipa
          path: /Users/runner/work/YOUR_APP/YOUR_APP/app/build-output/ios/YOUR_APP_NAME.ipa
          retention-days: 1
          if-no-files-found: error

      - name: Clean up keychain and provisioning profile
        if: ${{ always() }}
        run: |
          security delete-keychain $RUNNER_TEMP/app-signing.keychain-db
          rm ~/Library/MobileDevice/Provisioning\ Profiles/build_pp.mobileprovision

  distribute-ios:
    needs: build-ios
    runs-on: ubuntu-latest
    steps:
      - uses: actions/checkout@v2
      - uses: actions/download-artifact@v2
        with:
          name: App.ipa

      - name: Firebase App Distribution
        uses: wzieba/Firebase-Distribution-Github-Action@v1.3.2
        with:
          appId: ${{secrets.IOS_FIREBASE_APP_ID_STAGING}}
          token: ${{secrets.FIREBASE_TOKEN}}
          groups: testers
          file: YOUR_APP_NAME.ipa
As you can see, there are two steps, the first one is running on macOS for the compilation, while the second one is running on Linux to upload the IPA to Firebase App Distribution.
You need to replace the following things:
DEV_TEAMthe id of your dev team.PROVISIONING_PROFILE_IDthe id of the profileCODE_SIGNING_IDENTITYis the name of the identity signingYOUR_APPis the name of your repository (for instance for Lyokone/my_app, it will be my_app.YOUR_APP_NAMEis the name of your app once it's compiled, often it willMy App
You can find the information about code signing identity in the provisioning profile by opening it.
Conclusion
As you can see, you can quickly set up a CI to deploy to Firebase App Distribution and get feedback quickly on your project as you go without going through store validation!
You can always subscribe to my newsletter below and follow me on Twitter to not miss my next article!

